Week 6 · Session 2
Lists and Hardware
Several values under one name, then a light of your own.
What a List Is
colors = ["red", "yellow", "green"]: square brackets, items separated by commas, kept in the order writtencolors[0]is"red",colors[1]is"yellow",colors[2]is"green". Positions start at0len(colors)is3, so the last position islen(colors) - 1colors[3]stops withIndexError: list index out of range
Try It: Pick by Position
Run it as it is, then follow the bullets.
- Print
colors[1]andcolors[2] - Print
colors[3]and read the error. Which line does it point at? - Add a fourth color and run again. What is
len(colors)now, and which position is the new one at?
for Over a List
for color in colors:hands the block"red", then"yellow", then"green"- The name after
forholds the item itself, not its position rangehands over counts. Use it when the count is the point, and the list when the item is- The same loop works whether the list has three items or thirty
Try It: Every Item in Turn
- Add a fourth color to the list and run again. The loop does not change
- Print
"All off"once, after every color, without adding it to the list
The Pinout
GP labels sit beside each pin. Physical positions count 1 to 40 around the board.
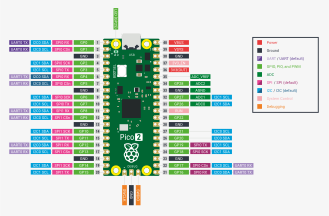
Pin(15, Pin.OUT)claimsGP15as an output: 3.3 volts for on, 0 volts for off. The number is the GP label, not the physical position- Today:
GP15at position 20 andGNDat position 38
The Breadboard
- Each short row of five holes is joined together under the plastic. Anything in the same row is connected
- The channel down the middle separates the left rows from the right rows
- The long strips along the edges are rails, joined end to end: red for
+, blue for- - The Pico sits across the channel, so every pin gets a row of its own
The LED and the Resistor
- An LED lets current through one way only. The long leg faces the pin, the short leg faces ground
- Backward, nothing lights and nothing breaks. Swap the legs
- The resistor keeps the current below what a pin can safely supply: 220 or 330 ohms, and it has no direction
One Light, Four Parts
Do This Now
Unplug, Then Wire One Light
- Unplug the USB cable first. Every time, before touching a wire
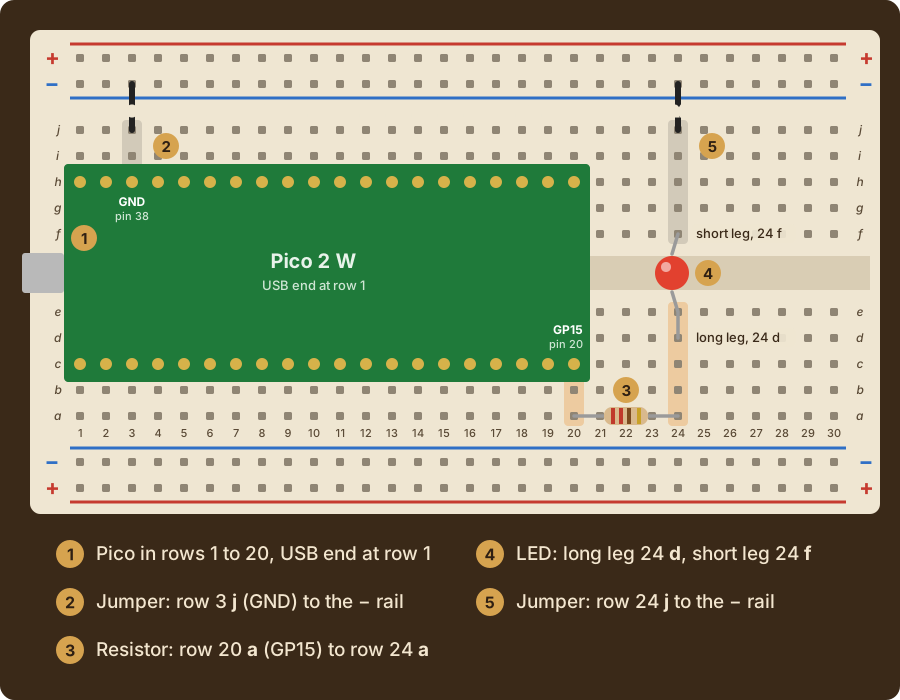
- Seat the Pico across the channel in rows 1 to 20, USB end at row 1
- Jumper from row 3, column j (
GND) to the blue-rail beside it - Resistor from row 20, column a (
GP15) to row 24, column a - LED across the channel: long leg in row 24, column d, short leg in row 24, column f
- Jumper from row 24, column j to the
-rail
Do This Now
Light It
- In
activities, New File,one_led.py from machine import Pinled = Pin(15, Pin.OUT)led.on()- Plug in, wait for Board Connected in the bar along the bottom, click Run
- Still dark: flip the LED. Then check the resistor starts in row 20, not its neighbor, and both jumpers reach the
-rail
Before You Leave
- One light on
GP15, lit by your own code - Leave the wiring in place. Lab 4 releases Friday and adds two more lights on
GP14andGP13 - Friday’s class is the optional Checkpoint 1 make-up, and catch up with any other work